Yeah, you’ve probably seen those LiDAR maps—the ones that strip away trees to reveal ancient ruins or show cityscapes in stunning 3D detail. They’re impressive.
But here’s a question
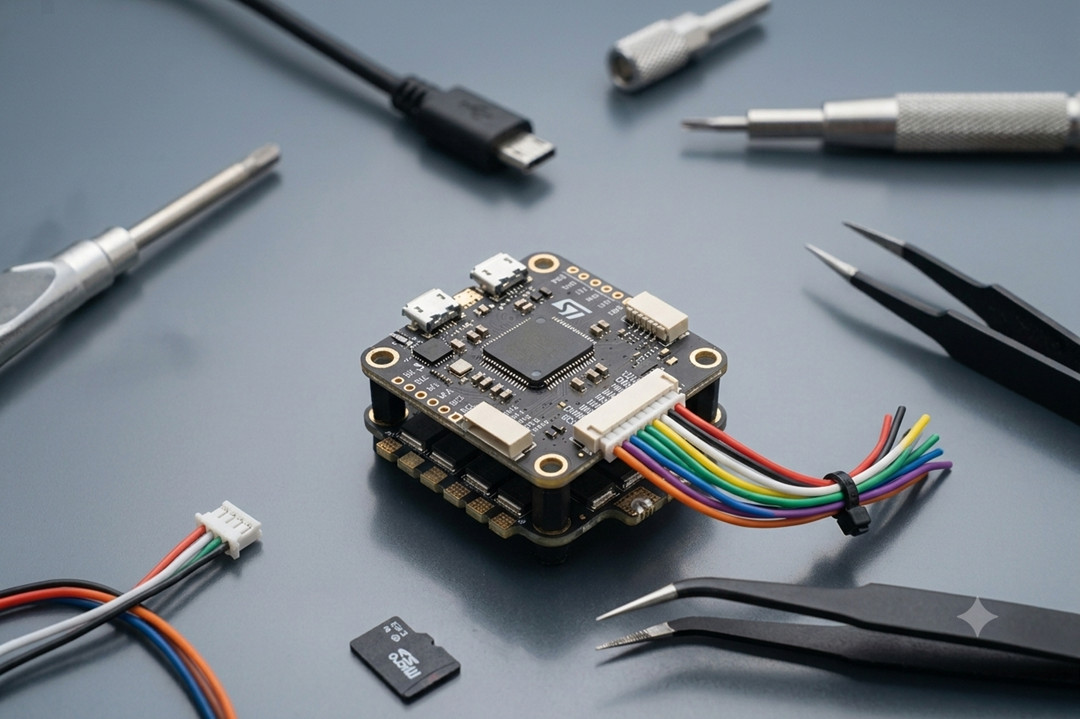
Every drone needs a brain.
Without it, you're holding an expensive paperweight with spinning blades.
That brain is called a flight controller—but most people have no idea what it actually does. They see terms like F4, F7, H7, Pixhawk, and SpeedyBee, and their eyes glaze over.
Here's the truth: the flight controller is the single most important electronic component on your drone. It decides whether your quad flips on takeoff or flies like a dream. It determines if you can add GPS, run autonomous missions, or trust your return-to-home function.
And yet, most guides make it sound like rocket science.
So let's cut through the noise.
This guide will walk you through exactly what a flight controller does, how the different chips (F4 vs. F7 vs. H7) compare, which boards are worth your money (from budget under $50 to industrial-grade Pixhawk and Cube Orange), and how to set everything up—connecting ESCs, calibrating sensors, and flashing firmware.
No fluff. No jargon for the sake of jargon. Just what you actually need to know.
Let’s get to work.
What Is a Flight Controller on a Drone?
Let’s start simple.
A flight controller is the circuit board inside your drone that keeps it in the air.
Think of it as the drone’s central nervous system. It reads sensors, listens to your remote control, calculates what the motors should do, and sends those commands—all in a fraction of a second.
Without a flight controller, your drone is just a pile of motors and carbon fiber. The moment you give it throttle, it will flip over and eat dirt. Because no human can manually balance four spinning propellers hundreds of times per second. That’s the flight controller’s job.
What Does a Flight Controller Do?
Four main things:
- Stabilizes flight – Gyroscopes and accelerometers tell the FC which way is up. If the drone tilts, the FC corrects it instantly.
- Processes your stick inputs – You push the right stick forward. The FC figures out which motors need to spin faster to move forward without losing balance.
- Navigates (if equipped with GPS) – Autonomous features like “return to home” or “hold position” are handled here.
- Talks to other components—The FC communicates with ESCs, receivers, GPS modules, payloads (cameras, LiDAR), and telemetry radios.
How Does a Flight Controller Work? (The PID Loop—Simplified)?
Inside every flight controller, there’s a loop running hundreds or even thousands of times per second. Engineers call it the PID loop. Here’s what happens in each cycle:
- Sense—The IMU (Inertial Measurement Unit) measures the drone’s current tilt, rotation speed, and acceleration.
- Compare—The FC compares where the drone is to where it should be (based on your stick inputs or mission plan).
- Correct—it calculates how much each motor needs to speed up or slow down.
- Output—It sends those commands to the ESCs, which adjust motor speeds.
This loop happens so fast that you never see the corrections. All you feel is a stable, responsive drone.
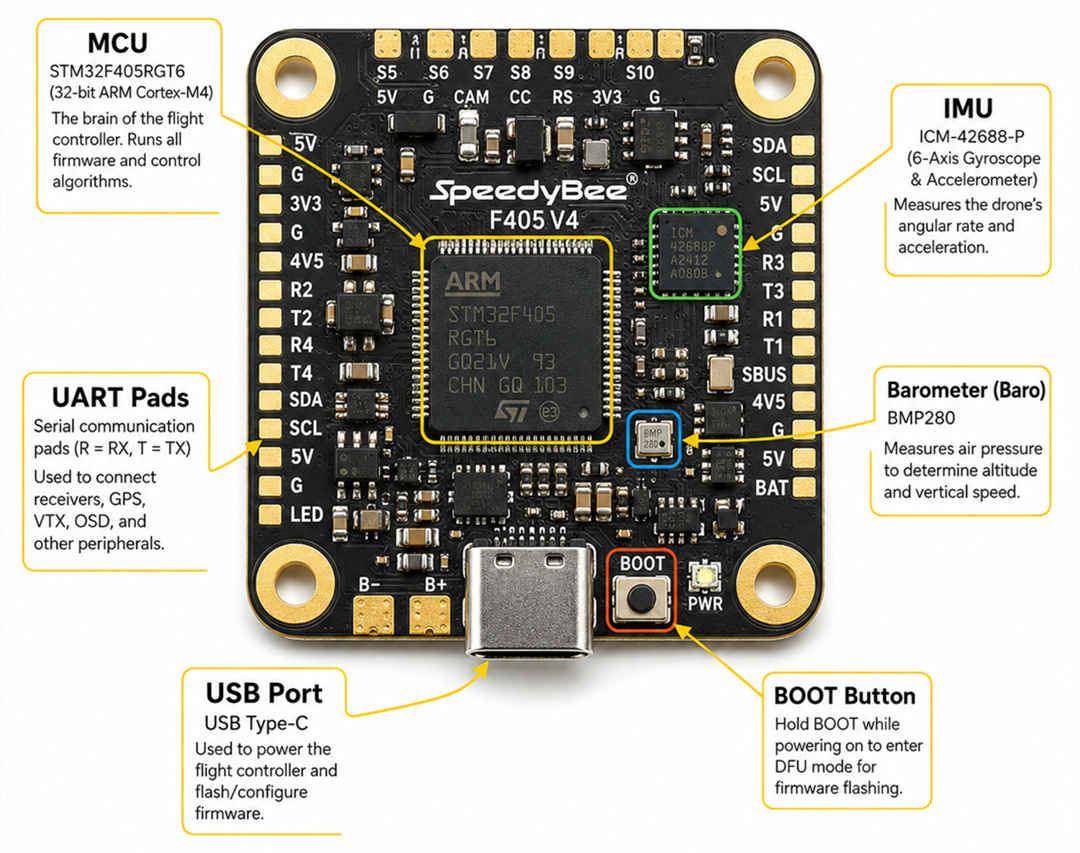
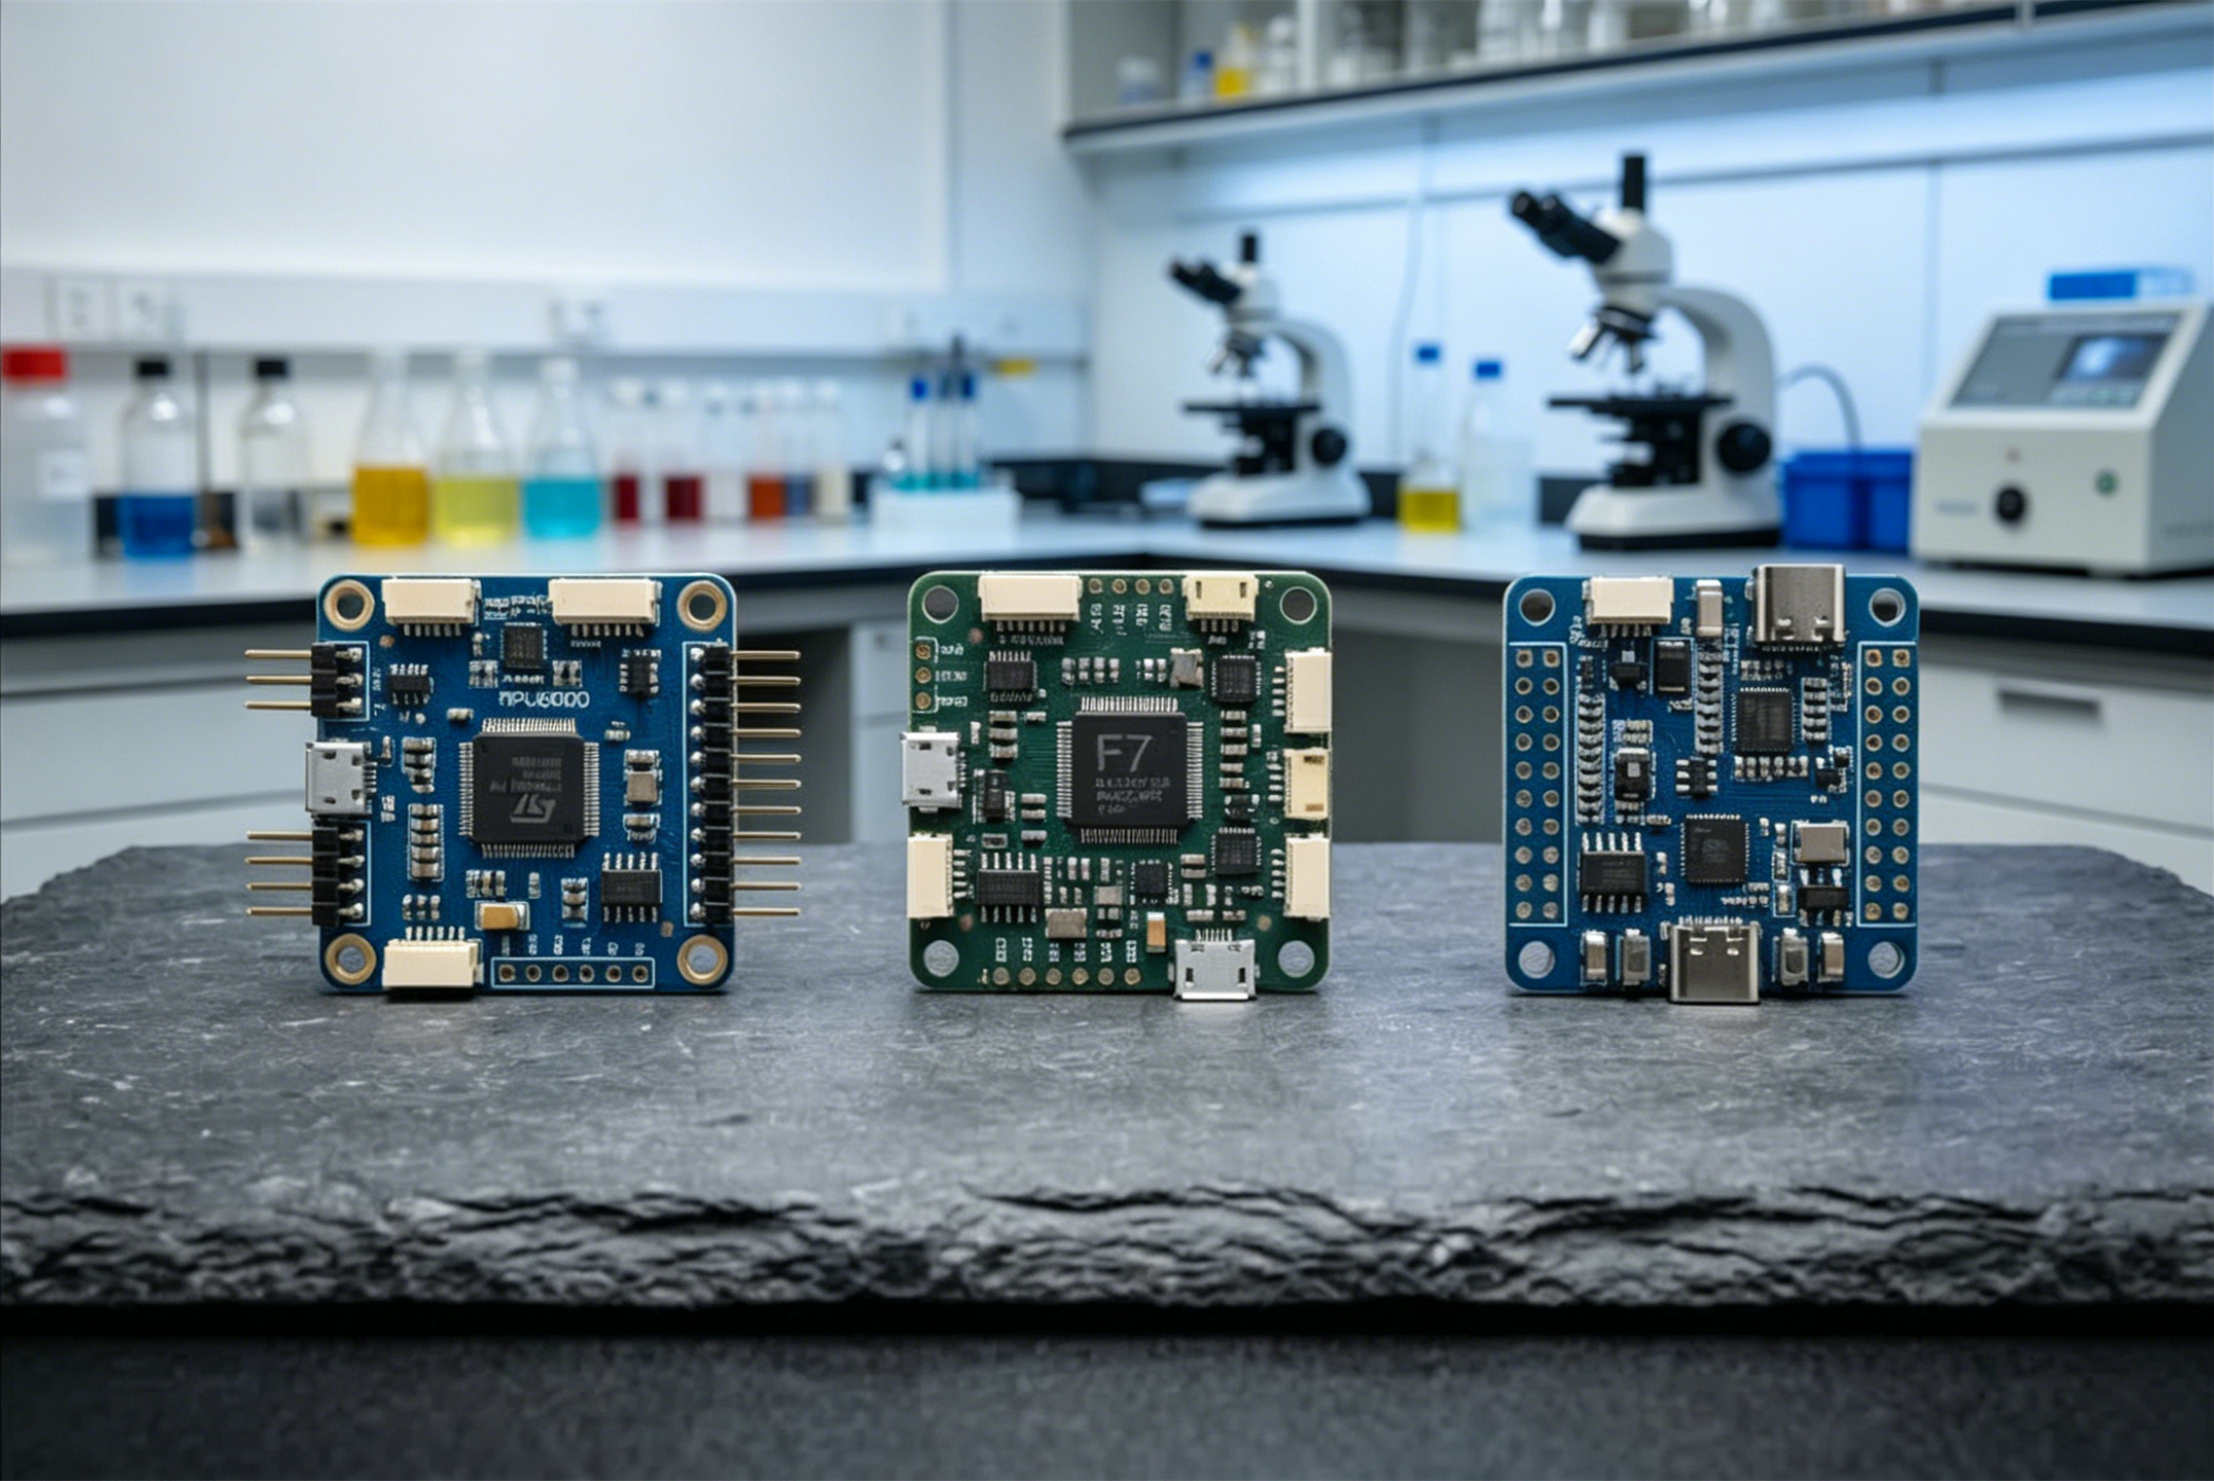
Key Components Inside a Flight Controller
A flight controller isn’t just a processor. It’s a small ecosystem of sensors and ports. Here’s what’s on board:
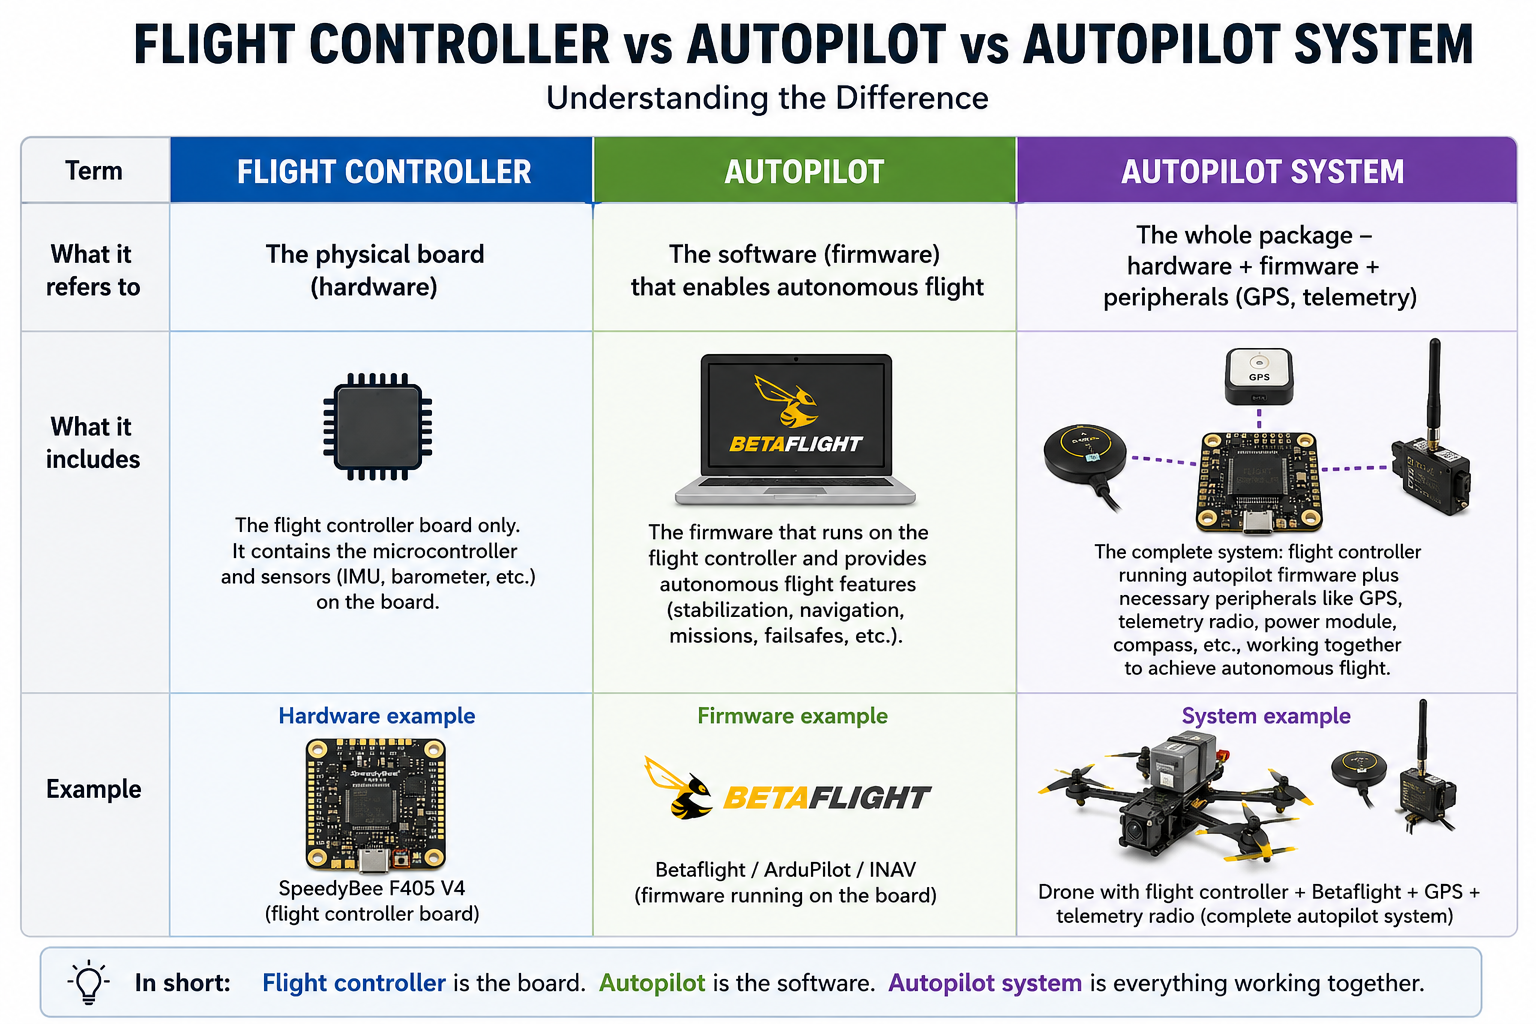
Flight Controller vs. Autopilot—What's the Difference?
You'll see these two terms thrown around like they mean the same thing.
They don't. But the confusion is understandable—because sometimes the exact same hardware can act as either one.
Here's the cleanest way to think about it:
- Flight controller = the hardware board. The physical thing with chips, sensors, and solder pads.
- Autopilot = the software (firmware) that runs on that hardware, plus the features it enables.
A simple analogy
Imagine a laptop:
- The laptop is the hardware—like a flight controller board.
- Microsoft Word is the software—like autopilot firmware.
You can run different software on the same laptop. Same with flight controllers.
Real-world example
Take a SpeedyBee F405 board.
- If you flash Betaflight onto it, it's an FPV flight controller. No GPS waypoints, no autonomous missions. Just fast, responsive manual flight.
- If you flash ArduPilot onto the exact same board, it becomes an autopilot. Now it can fly waypoint missions, return home automatically, and survey a field without you touching the sticks.
Same hardware. Different job.
So what's an "autopilot system"?
When people say "Pixhawk autopilot", they usually mean the entire system: the Pixhawk flight controller board + ArduPilot or PX4 firmware + GPS + telemetry radios + ground control software. So:
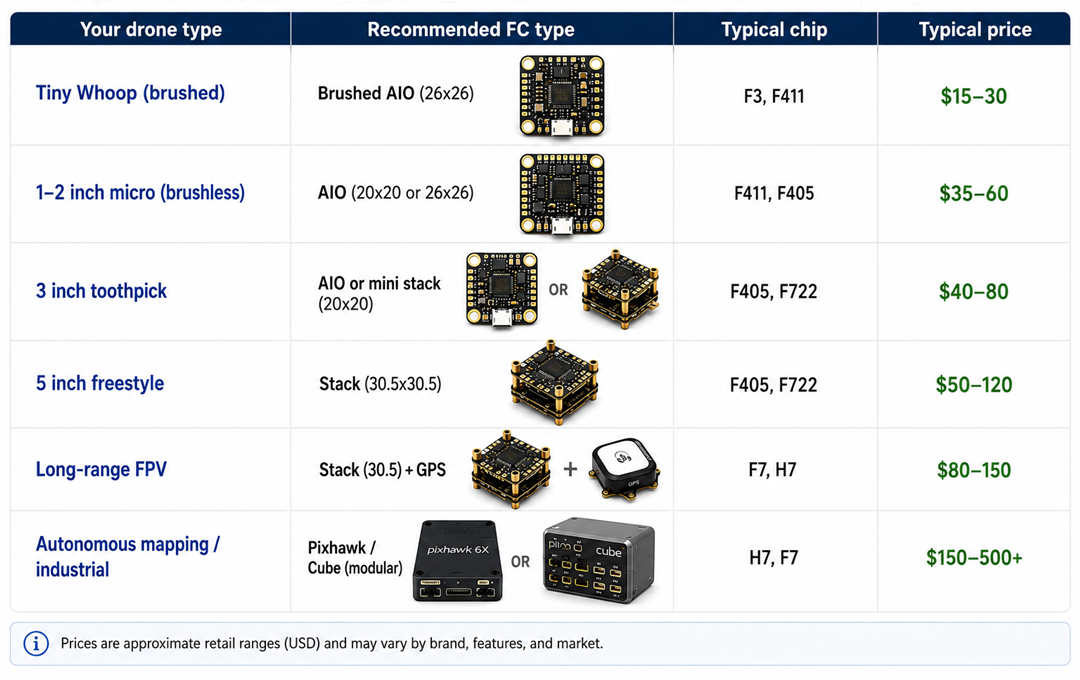
Mini flight controller is a loose term – usually refers to 20x20mm boards or compact AIOs.
Quick Reference Table – Which Type Should You Choose?
F4 vs F7 vs H7 Flight Controllers – Which Processor Should You Choose?
Now we get to the heart of every flight controller: the microcontroller chip.
Almost all modern flight controllers are built around STM32 chips from STMicroelectronics. You'll see names like F405, F722, H743. The letter and number tell you the processor family – and that determines what the flight controller can handle.
Here's what you actually need to know, without the engineering degree.
The STM32 Family – A Quick Overview
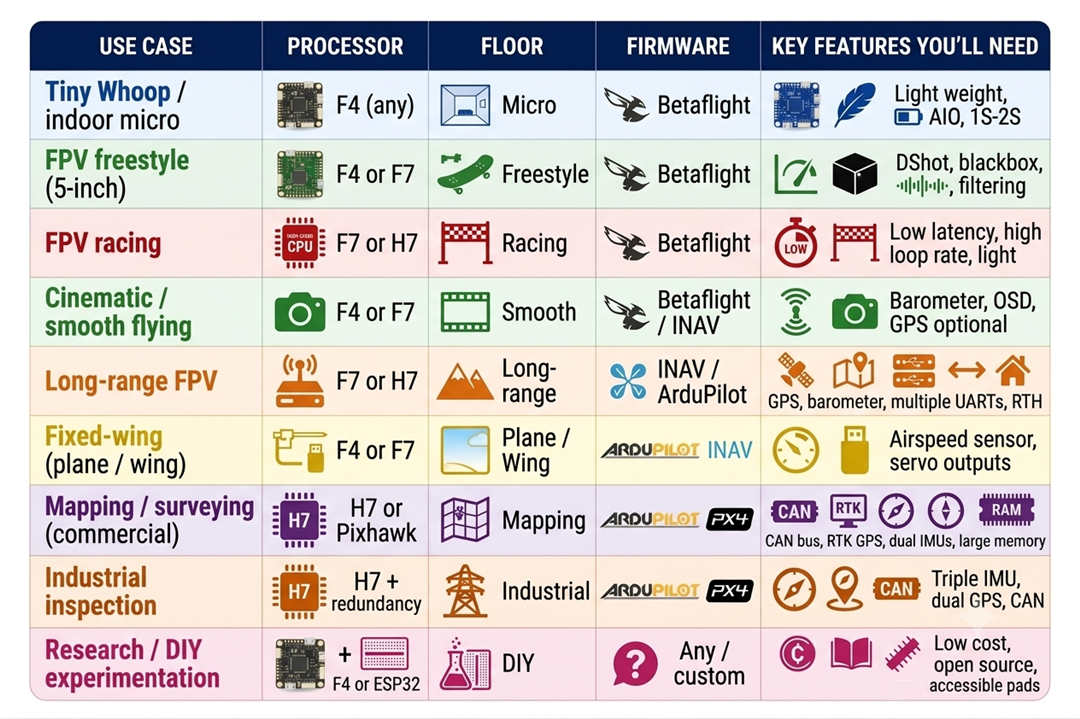
Best Flight Controllers — Top Recommendations by Use Case
Alright, let’s get practical. You know what a flight controller does and how to pick the right processor. Now here are the actual boards you should be looking at in 2026.
I’ve organized this by how you actually fly. Skip to your use case and ignore the rest.
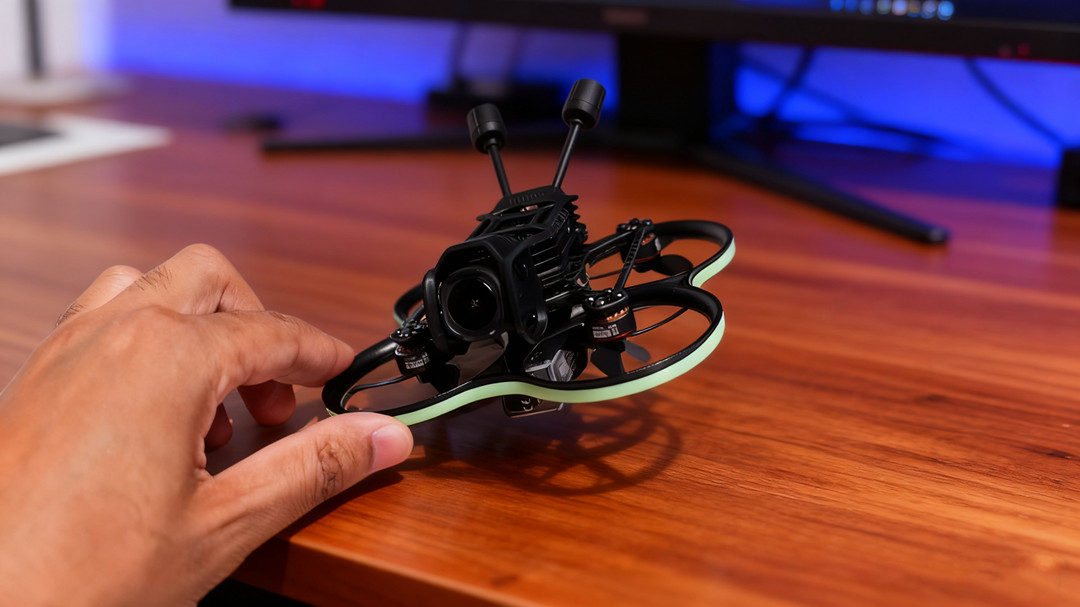
Best FPV Racing / Freestyle Flight Controllers
If you fly low, fast, and through gaps, you don’t need GPS, you don’t need a barometer, and you definitely don’t need triple-redundant IMUs. What you need is low latency, a clean signal, and hardware that won’t fail mid-powerloop.
For most FPV pilots, an F4 board is still enough and flies very well. For most 5-inch freestyle builds with just a receiver, VTX control, and basic telemetry, F4 has enough CPU performance for smooth flying. It’s mature, well-supported, and strong value.
But F7 has a place, too. The benefit isn’t really raw speed in flight feel — that jump is usually small. Where F7 shines is flexibility: more serial ports (UARTs), cleaner resource mapping, and less compromise when adding GPS, external receivers, or extra sensors later. If you think you might add a GPS module down the line for long-range flights, F7 is a sensible buffer.
Here are the best options in 2026:
Note on F405 vs. F722 memory for GPS builds: The SpeedyBee F405 V4 has 1MB flash; the SpeedyBee F7 V3 has an F722 processor with only 512KB flash. Less memory may restrict the number of features you can enable in INAV or ArduPilot as firmware keeps expanding.
For long-range builds where you might run GPS, telemetry, OSD, logging, and more simultaneously, the F405’s 1MB flash is a subtle but real advantage over some F7 boards.
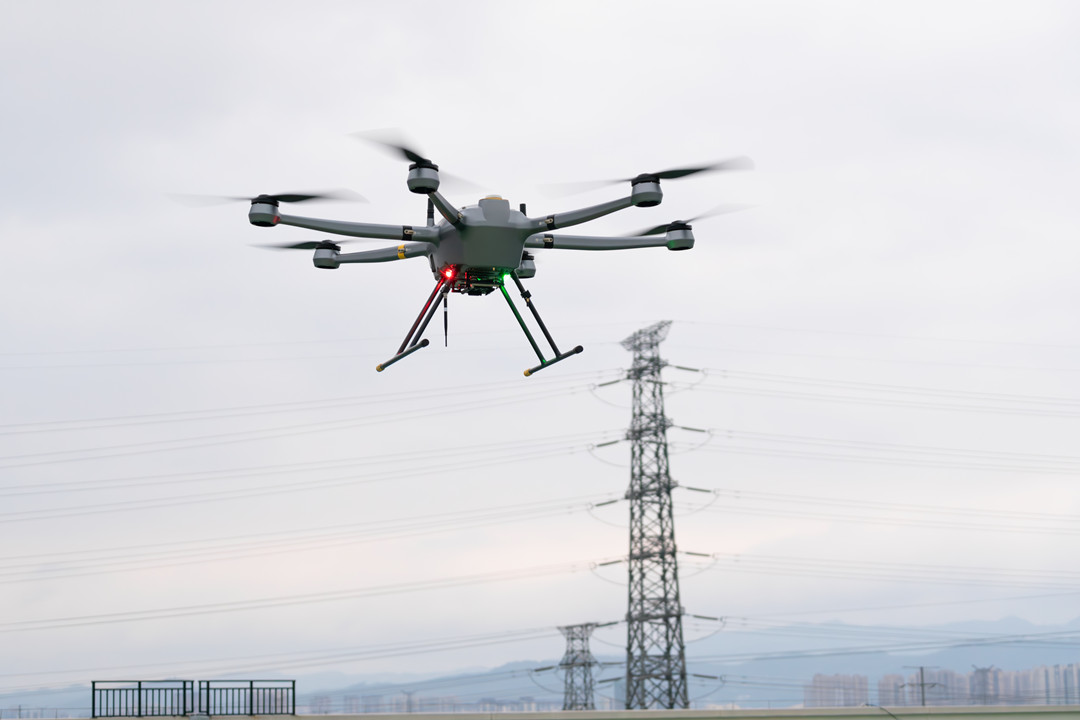
Best Industrial / Commercial Autopilots (ArduPilot / PX4)
This is where we stop playing games. Industrial UAVs — mapping, inspection, agriculture, delivery — need reliability, not just speed.
These systems typically run ArduPilot or PX4 firmware. They need redundant sensors, CAN bus for payload communication, RTK GPS support, and the ability to survive a component failure without crashing.
If you are building a commercial drone or a research platform that carries expensive payloads (LiDAR, multispectral cameras, thermal sensors), do not cheap out here.
How to Choose a Flight Controller — A Practical Decision Framework
By now you’ve seen dozens of model names, processor numbers, and price tags. It’s easy to get stuck.
So let’s flip this around. Instead of starting with specs, start with what you actually want to do.
This framework has eight questions. Answer them honestly, and you’ll land on the right type of flight controller — often down to just two or three models.
Step 1 — What Is Your Main Use Case?
This is the most important question. Everything else flows from it.
How to Set Up and Configure Your Flight Controller — Step‑by‑Step Tutorials
So you’ve picked a flight controller. Now what?
This section walks you through the most common setup and configuration tasks. I’ve ordered them from “you’ll do this every time” to “only when something goes wrong.”
Before you start: Always remove your propellers when working on a drone connected to a battery or USB. One accidental motor spin can send you to the ER.
How to Connect 4‑in‑1 ESC to Flight Controller
Most modern FPV stacks come with a 4‑in‑1 ESC and a flight controller designed to plug directly into it. Here’s how to wire them up.
What you’ll need: 4-in-1 ESC, flight controller, the included 8-pin ribbon cable (or individual wires), and soldering iron (if your stack uses pads instead of plugs).
Step‑by‑step:
1. Locate the connectors. On most stacks, the ESC has an 8‑pin female header. The FC has a matching 8‑pin male header or a set of pads labeled “ESC” or “4‑in‑1”.
2. Use the included cable. The ribbon cable usually has eight wires: GND, VCC (battery voltage), M1, M2, M3, M4, CUR (current sensor), and VBAT (voltage sense). The pin order varies by brand. Always check the wiring diagram that came with your stack. Plugging it in wrong can fry your FC.
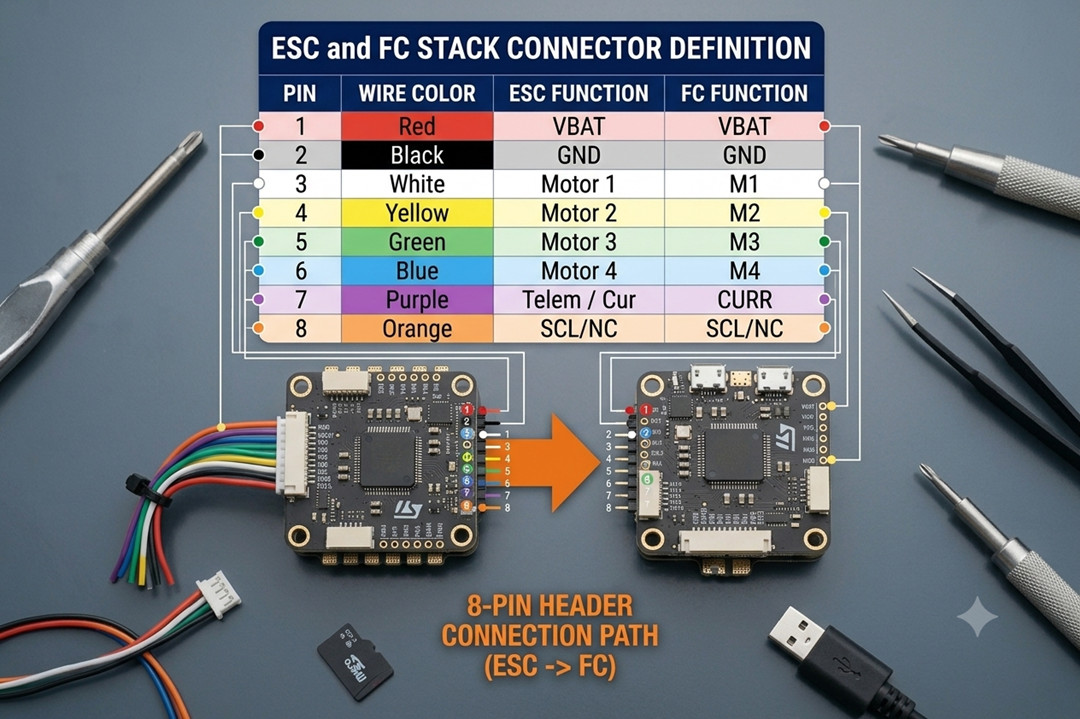
3. Connect plug to plug. If both boards have headers, just connect the cable. If your FC uses solder pads, strip and solder each wire according to the pinout.
4. Secure the stack. Mount the FC on top of the ESC using the provided nylon standoffs. Do not overtighten—you want the boards to sit firmly without bending.
5. Connect the battery lead. Solder your XT60 (or other connector) to the ESC’s BAT+ and BAT- pads.
Test. Power on the FC via USB first (no battery) to see if it connects to your computer. Then disconnect USB, plug in the battery, and check for magic smoke. If everything stays cool, you’re good.
Common mistake: Connecting the ribbon cable backwards or offset by one pin. Most connectors are keyed, but not all. When in doubt, trace each wire with a multimeter.
How to Calibrate Flight Controller (Accelerometer)
Calibrating the accelerometer tells the FC which way is level. Do this after every new build, after a crash, or if the drone drifts in angle/horizon mode.
Step‑by‑step (Betaflight):
1. Place your drone on a perfectly level surface. A spirit level helps, but a known‑flat table is usually fine.
2. Connect the FC to your computer via USB. Open Betaflight Configurator.
3. Click the “Setup” tab. You’ll see a 3D model of your drone. If it’s not level on screen, proceed.
4. Click the “Calibrate Accelerometer” button. Wait 2–3 seconds. The model should snap to level.
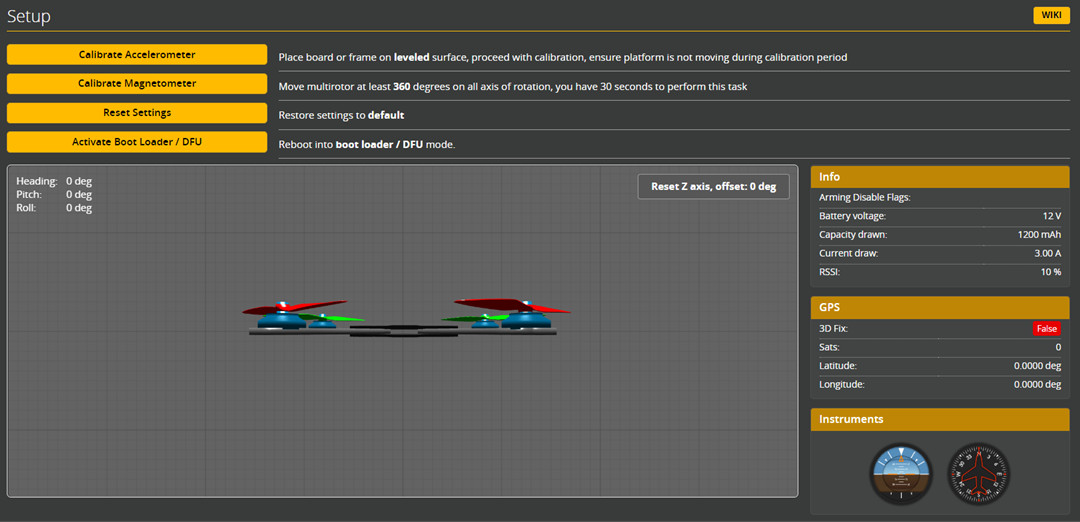
Image source: betaflight.com
Optional but recommended: Tilt the drone forward, right, etc., and watch the 3D model move accordingly. If it moves correctly, calibration succeeded.
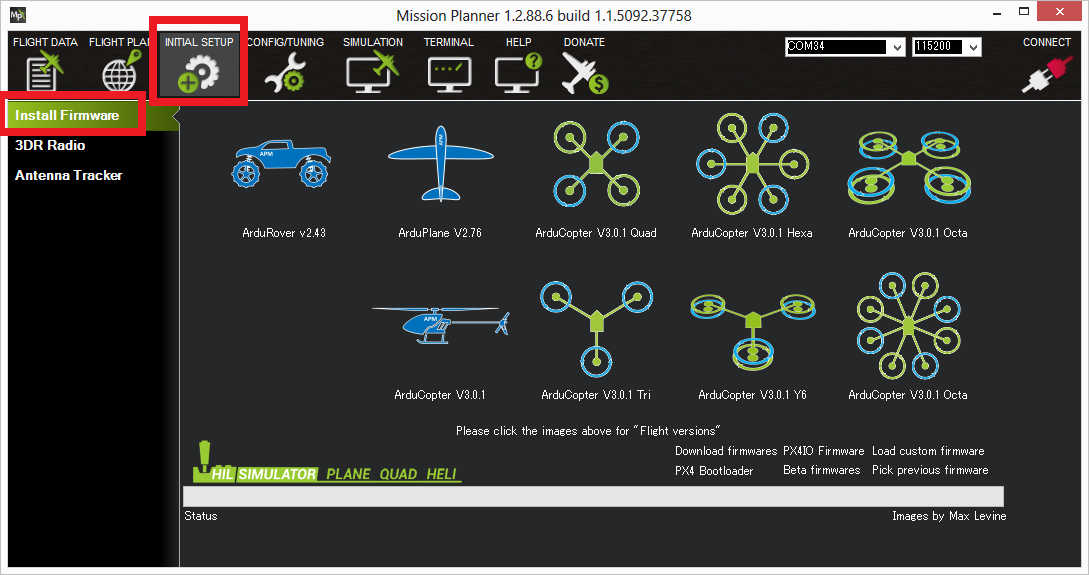
Step‑by‑step (ArduPilot / Mission Planner):
1. Place the drone level.
2. Connect via USB. Open Mission Planner.
3. Go to Setup → Mandatory Hardware → Accelerometer Calibration.
4. Click “Calibrate Accelerometer” and follow the on‑screen instructions. You’ll be asked to place the drone in six different orientations (level, left side down, right side down, nose down, nose up, upside down). Click “OK” after each position.
5. Wait for completion. This takes about 30 seconds.
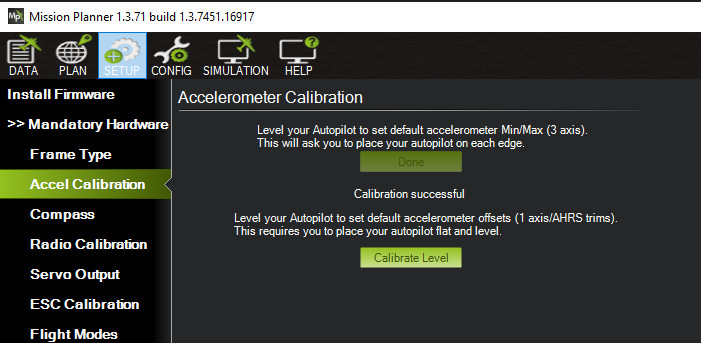
Image source: ardupilot.org
What if it still drifts after calibration? Check your radio’s stick trims (they should be centered). Also check for vibrations — a badly balanced prop can confuse the accelerometer.
How to Calibrate Flight Controller (ESC Calibration)
ESC calibration ensures all motors spin at the same speed for the same throttle input. Most modern ESCs that support DShot do not need calibration. If your ESC uses PWM, OneShot, or Multishot, calibrate them.
WARNING: Remove propellers before doing this. Motors will spin at full speed.
Step‑by‑step (Betaflight):
1. Connect the FC to Betaflight. Go to the “Motors” tab.
2. Check the box that says “I understand the risks” (or similar). This enables motor control.
3. Move the master throttle slider all the way to the top (maximum). You’ll hear the ESCs make a continuous tone.
4. Plug in the battery (not USB only — the battery must power the FC to send high signals to ESCs). The ESCs will beep a different pattern.
5. Move the master slider to the bottom (minimum). The ESCs will beep again to confirm calibration.
6. Disconnect the battery, then reconnect. Your ESCs are now calibrated.
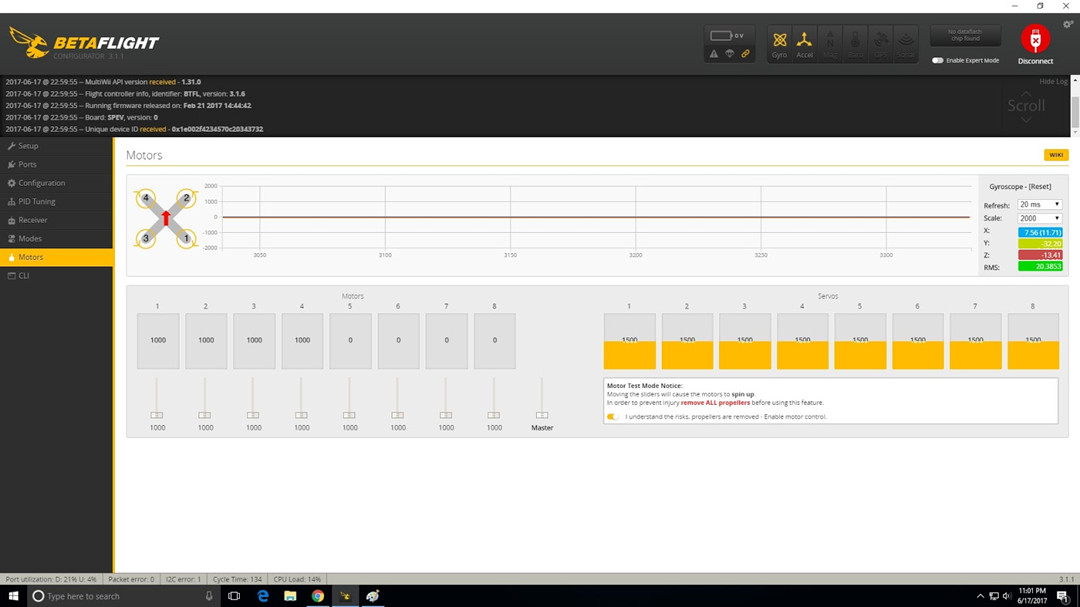
Image source: betaflight.com
For ArduPilot: Use Mission Planner’s ESC Calibration wizard under Setup → Optional Hardware → ESC Calibration.
If calibration doesn’t work: Check that your ESC protocol is set correctly (PWM, Oneshot125, etc.) in the Configuration tab. DShot does not require calibration.
How to Mount the Flight Controller
Proper mounting is critical. A poorly mounted FC vibrates, which confuses the gyro and causes hot motors, mid‑throttle oscillations, and drifting.
What you need: Silicone grommets, rubber standoffs, or soft mounting “O‑rings.” Nylon screws (metal screws can short out pads).
Step‑by‑step:
1. Identify the mounting pattern. Most FCs use 30.5×30.5mm, 20×20mm, or 25.5×25.5mm. Your frame should have matching holes.
2. Install soft mounts. Place silicone grommets or rubber bobbins between the FC and the standoffs. Many frames include them. If not, buy a pack of M3 silicone vibration dampers.
3. Orientation matters. The arrow on the FC must point toward the front of the drone. If you mount it sideways or backwards, you’ll have to remap the gyro orientation in software.
4. Secure with nylon screws. Push the screws through the soft mounts and into the standoffs. Tighten until snug—not tight. Overtightening compresses the soft mounts and defeats their purpose.
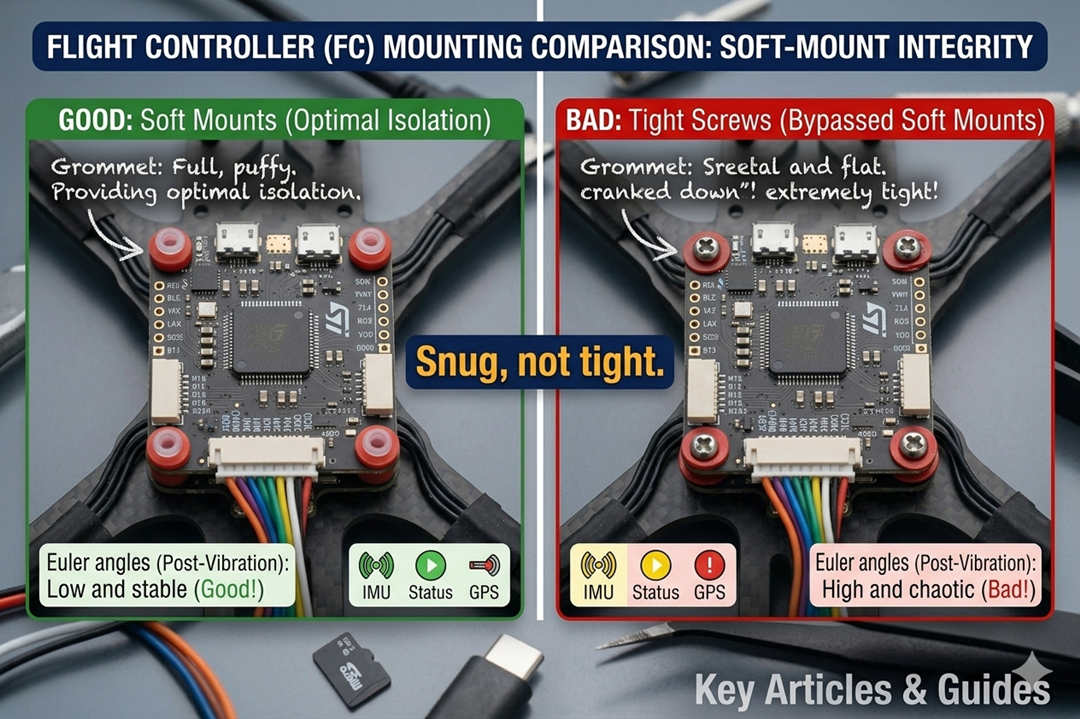
5. Check clearance. Ensure no wires are pinched under the FC and that the USB port is accessible.
Pro tip: Some builders “hard mount” (directly screw the FC into metal standoffs) on very rigid frames. This can work if the frame absorbs vibrations well. For most builds, soft mount.
How to Connect the Flight Controller to the Receiver
Your receiver (the thing that gets signals from your radio transmitter) connects to the FC via a UART. Here’s how.
For SBUS / FPort receivers (most common):
1. Identify the correct pads. On the FC, look for “RX” pads. You’ll connect the receiver’s signal wire to an RX pad. Common choices: RX1, RX2, RX3, or a pad specifically labeled “SBUS”.
2. Power the receiver. Most receivers need 5V and GND. Connect these to any 5V and GND pad on the FC.
3. Wire it up: Receiver “GND” → FC “GND”. Receiver “5V” → FC “5V”. Receiver “SIGNAL” (or “SBUS”) → FC “RX” pad (e.g., RX3).
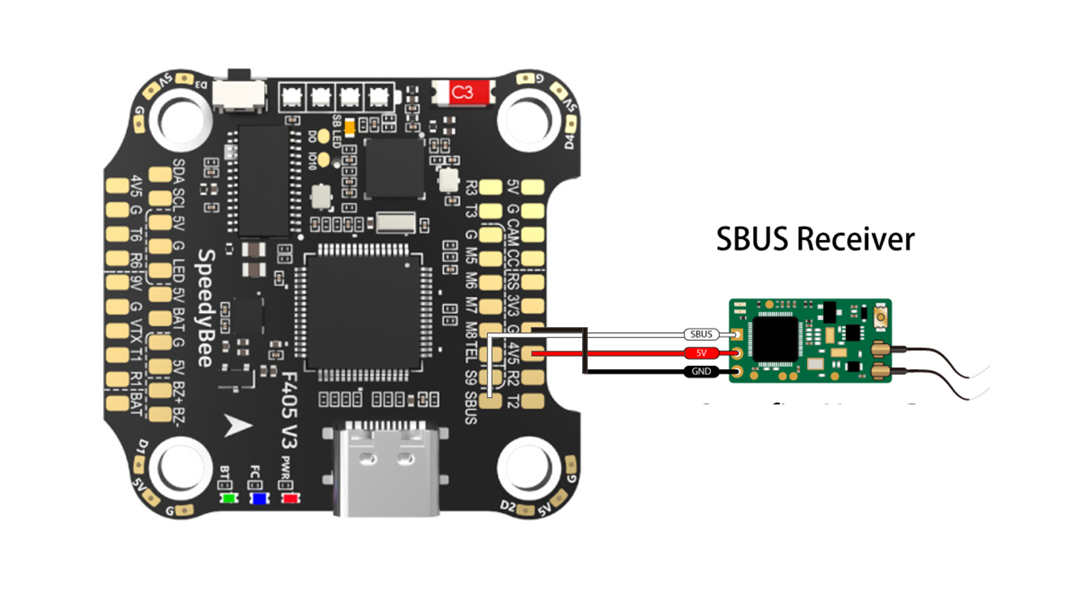
Image source: speedybee.zendesk.com
4. Configure Betaflight: In the Ports tab, find the UART you used (e.g., UART3). Turn on “Serial RX” for that UART. Click Save.
5. Configure Receiver tab: Go to the Receiver tab. Set “Receiver Mode” to “Serial‑based receiver”. Set “Serial Receiver Provider” to “SBUS” (for FrSky) or “CRSF” (for Crossfire/ELRS). Save.
For CRSF (Crossfire / ExpressLRS): Same wiring, but you may also need to connect the receiver’s TX pad to an FC RX pad (for telemetry). Most ELRS receivers use a single UART for both RX and TX — connect as above.
Testing: Power the drone via USB. Turn on your radio. In Betaflight’s Receiver tab, move the sticks. You should see colored bars moving.
How to Connect Servo to Flight Controller (Fixed-Wing / VTOL)
If you’re building a fixed‑wing, a VTOL (like JOUAV’s CW series), or a drone with a drop mechanism, you’ll need to connect servos.
Step‑by‑step:
1. Identify PWM output pads. On most FCs, these are labeled M5, M6, M7, M8, or “SERVO1, SERVO2”. They output standard PWM signals.
2. Power the servo. Servos draw more current than the FC's 5V rail can provide. Connect the servo’s red and black wires to a separate BEC (battery elimination circuit) — either a standalone BEC or the BEC output from your PDB/ESC. Typically, 5V or 6V, depending on the servo.
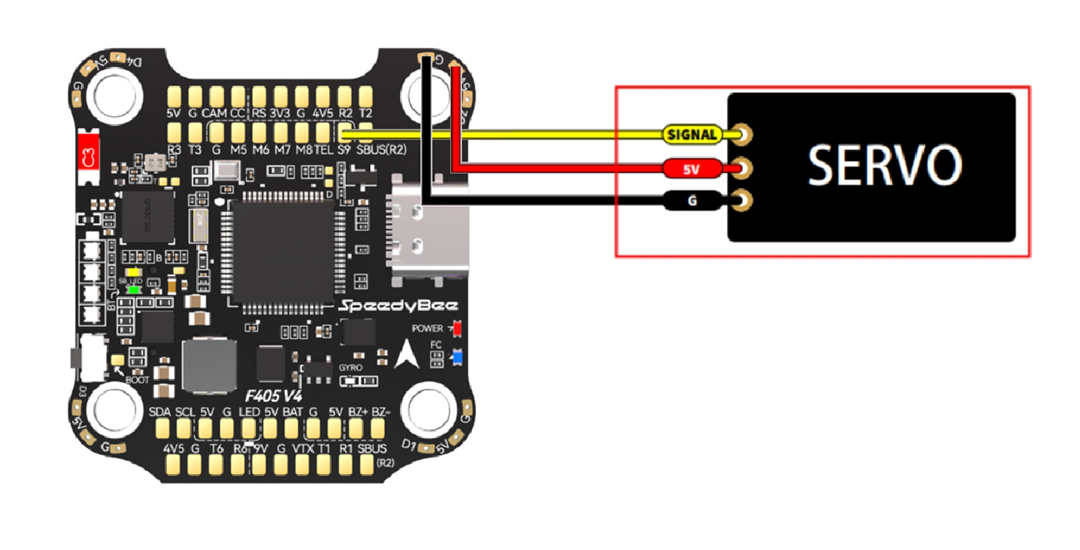
Image source: speedybee.zendesk.com
3. Connect the signal wire. The servo signal wire (usually white or yellow) goes to the PWM pad on the FC.
4. Configure in software:
- Betaflight / INAV: Go to the Servos tab. Assign the servo to a channel (e.g., channel 5 on your radio). Set the output range (usually 1000–2000 µs).
- ArduPilot: Use Mission Planner’s Servo Output panel. Assign a servo function (e.g., aileron, elevator, drop) and set PWM mins/maxs.
5. Test. Power the system (battery, not just USB — servos need 5V). Move the assigned stick or switch. The servo should move smoothly.
Warning: Do not connect a servo directly to an FC’s 5V pad if the servo draws more than 500 mA. Many servos will brown out the FC, causing a crash.
How to Flash Flight Controller (Firmware Update)
Flashing updates the flight controller’s operating system—Betaflight, INAV, ArduPilot, or PX4. You’ll do this when you first get the board (to ensure the latest features) or when a new version fixes a bug.
Step‑by‑step (Betaflight):
1. Download the correct firmware target. Go to the Betaflight Configurator Firmware Flasher tab. In the “Firmware” dropdown, select your FC’s target (e.g., “FOXEERF722V4”). If unsure, run the version command in CLI or check the manufacturer’s website.
2. Put the FC into DFU mode. Most FCs enter DFU (device firmware upgrade) mode automatically when you plug in USB. If not:
- Hold the BOOT button (a small physical button on the FC).
- While holding, plug in USB.
- Release the button after 2 seconds. The FC should appear as “STM32 BOOTLOADER” or similar in Windows Device Manager.
3. Select the firmware version. Choose the latest stable release (e.g., 4.5.1). Leave “Full chip erase” checked.
4. Flash. Click “Load Firmware [Online]” (it will download), then “Flash Firmware”. Wait 30–60 seconds.
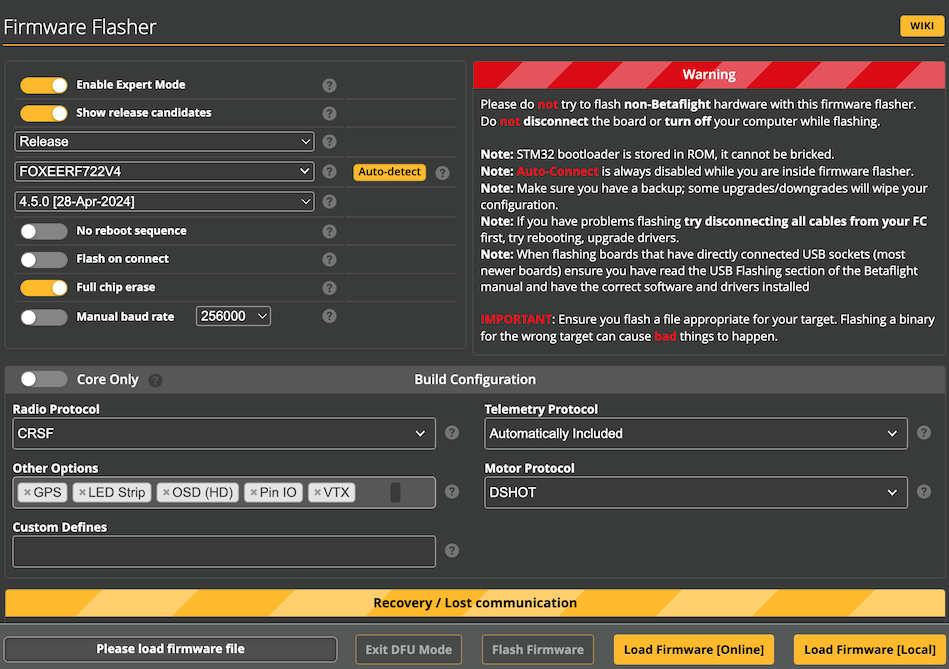
Image source: betaflight.com
5. Reconnect. After flashing, disconnect USB and reconnect. Go to the Setup tab. You should see the Betaflight version updated.
Step‑by‑step (ArduPilot / Mission Planner):
1. Open Mission Planner. Go to Initial Setup → Install Firmware.
2. Select your FC type (e.g., “Pixhawk 1”, “Cube Orange”, “Matek F405‑Wing”). Mission Planner will download the appropriate .apj file.
3. Put your FC into bootloader mode (similar DFU or press the BOOT button).
4. Click “Upload Firmware”. Wait. The FC will reboot automatically.
Troubleshooting:
- DFU not detected (Windows): Install the ImpulseRC Driver Fixer or Zadig to replace the STM32 bootloader driver.
- Flash fails mid‑way: Try a different USB cable (data‑capable, not charge‑only). Short cables work best.
How to Program a Flight Controller (What “Programming” Actually Means)
Most people mean configuring rather than writing code. Here’s what each term covers.
Configuring (what 99% of users do):
- Adjusting PID values
- Changing rates and expo
- Setting up modes (arm, angle, horizon, etc.)
- Configuring ports for receivers and peripherals
- Setting up OSD elements
You do all of this through Betaflight Configurator, INAV Configurator, or Mission Planner’s graphical interfaces. No coding required.
Advanced configuring (CLI commands): In Betaflight, go to the CLI tab. You can type commands like set motor_pwm_protocol = DSHOT600, set gyro_lpf1_type = PT1, or diff all to see your configuration. This is still not programming — it’s setting parameters.
Real programming (writing code): If you want to modify the firmware itself (e.g., add custom logic for a research project), you need to:
- Fork the Betaflight, INAV, or ArduPilot GitHub repository.
- Set up a development environment (STM32CubeIDE, VS Code with PlatformIO).
- Write C/C++ code.
- Compile the firmware into a .hex file.
- Flash that custom firmware onto your FC.
This is advanced work for embedded software engineers. For almost everyone, the graphical configurators are sufficient.
How to Find Flight Controller Serial Number (SN)
Some firmware activations or warranty claims require the FC’s serial number.
Where to look:
1. On the board itself: Most FCs have a QR code sticker on the bottom or top of the PCB. The SN is printed nearby. Look for an 8–16 digit alphanumeric string.
2. On the packaging: The original box often has a label with the SN.
3. Via Betaflight CLI (some FCs): Connect to Betaflight, open the CLI, and type get serial_number. Not all boards support this command. If it returns "unknown", the SN is not stored in firmware.
4. On the manufacturer’s configuration software: Some brands (e.g., SpeedyBee) show the SN in their mobile app when connected via Bluetooth.
If you can’t find it: For most hobbyist FCs, the SN is only needed for warranty claims. Contact the retailer with proof of purchase — they often have records.
How to Turn On the Xbox Controller for Flight Simulator
Want to practice flying without crashing real drones? Use a flight sim. An Xbox controller works great for getting started.
Step‑by‑step (Windows):
1. Connect the Xbox controller:
- Wired: Plug in via USB‑C or micro‑USB. Windows will install drivers automatically.
- Wireless (Bluetooth): Go to Windows Settings → Bluetooth & devices → Add device → Bluetooth. Press the Xbox controller’s pairing button (top edge). Select “Xbox Wireless Controller”.
2. Open your flight simulator. Popular options: Liftoff, VelociDrone, Uncrashed, TrypFPV, DRL Sim.
3. Go to controller settings. Usually under Options → Input or Controller Configuration.
4. Select “Xbox Controller” from the device list.
5. Map the axes (if not auto‑detected):
- Left stick up/down = Throttle (or Pitch)
- Left stick left/right = Yaw (or Roll — depends on mode)
- Right stick up/down = Pitch
- Right stick left/right = Roll
- Triggers = could be camera angle or throttle (optional)
- Calibrate in the sim’s calibration tool. Move each stick to full travel and center.
- Test fly. If the drone drifts, adjust deadband settings in the sim.
Best controllers for drone sims: Xbox (any), PlayStation 4/5, or a dedicated RC transmitter with a USB dongle (e.g., Radiomaster Zorro, FrSky Taranis). The Xbox is cheap and accessible — great for beginners.
How to Connect Controller to Flight Simulator (General)
Same process as above, but for any gamepad or RC transmitter:
For USB gamepads (Logitech, PS, Nintendo, etc.):
- Plug in USB. Windows recognizes it as a generic game controller.
- Open your sim. Go to Input settings.
- Select the controller from the dropdown.
- Manually map axes and buttons (most sims have a “learn” or “auto‑detect” wizard).
For RC transmitters (FrSky, Radiomaster, Spektrum):
- Most require a USB dongle (e.g., FrSky XSR‑SIM) or direct USB‑C connection (newer radios like the Radiomaster Boxer).
- Connect the transmitter to the PC via USB (select “Joystick” or “HID” mode on the radio).
- The transmitter appears as a game controller in Windows.
- Calibrate in the sim.
Pro tip: For muscle memory, flying a sim with your actual RC transmitter is better than an Xbox controller — the stick feel is identical. But the Xbox is fine for learning basic orientation and throttle control.
Summary — Getting Your FC Ready to Fly
You’ve connected the ESC, calibrated the sensors, mounted the board, wired the receiver, flashed fresh firmware, and set up your simulator controller. That’s the heavy lifting.
If you’re building a drone for the first time, take it slow. Do one step, test, then move to the next. A methodical build is a successful build.
Read More

Let me tell you something that happens way too often.
A company spends $15,000 on a drone, excited about the flight time and range. They get it in the air and mount their LiDAR sensor—and the drone ba
Have you ever watched a drone hover effortlessly over a construction site, inspect a wind turbine blade, or deliver medical supplies to a remote village?
That drone was almost certainly a multirotor.

JOUAV Product News and Use Cases
Fixed-Wing VTOL Drones Insights and Industry Trends
Invitations to online demo events